


Mounting styles and hole cut-outs for type LM
The fan sleeves for type LM can be fixed in 4 different ways, depending on the hole cut-outs and space circumstances. It has to be used just one hole cut-out possibility to mount the sleeve on a mounting plate or housing wall.
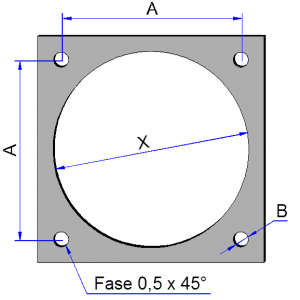
Plug-in mounting style/ hole cut-out no.1
First of all pull the sleeve over the flange of the fan. Then plug-in the four pegs through the drilled holes B of the mounting panel and pull them out on the backside. Therefore the drilled
holes need to be chamfered slightly from the installation-side.
This hole cut-out is preferred, if space circumstances are very tight. The backside however needs to be accessible for being able to pull out the pegs.
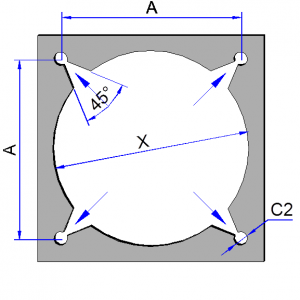
Plug-and-pull mounting style/ hole cut-out no.2
the flange of the fan.
This hole cut-out is preferred, if there is enough space arround the fan for being able to pull the sleeve over the flange. The backside needs not to be accessible.
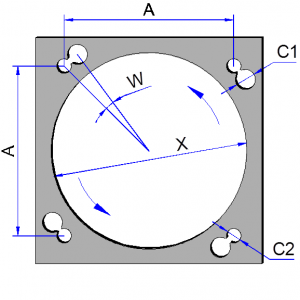
Plug-and-turn mounting style/ hole cut-out no.3
This hole cut-out is the most popular one. However there must be enough space for installation for being able to turn the fan including the fan sleeve. The backside needs not to be
accessible.
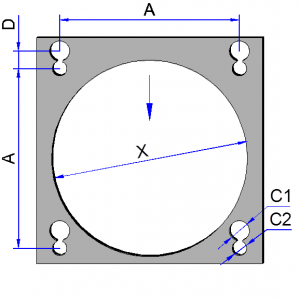
Plug-and-push/ pull mounting style/ hole cut-out no.4
This hole cut-out is also a very popular one. However there must be enough space for installation for being able to push/ pull the fan including the fan sleeve in one direction. The
backside needs not to be accessible.
Dimensions hole cut-outs
| Dimensions hole cut-outs | A | B | C1 | C2 | D | R | W |
|---|---|---|---|---|---|---|---|
| Für LM-25-... | 20,0 | 3,8 | 3,5 | 4,5 | 3,50 | 0,2 - 0,5 | 14,5° |
| Für LM-30-... | 24,0 | 4,5 | 5,5 | 4,0 | 5,00 | 0,5 - 1,0 | 16,5° |
| Für LM-40-... | 32,0 | 5,0 | 6,5 | 4,5 | 5,75 | 0,5 - 1,0 | 14,5° |
| Für LM-50-... | 40,0 / 42,0 | 5,0 | 6,5 | 4,5 | 5,75 | 0,5 - 1,0 | 11,0° |
| Für LM-60-... | 50,0 | 5,5 | 7,5 | 5,0 | 6,5 | 0,5 - 1,0 | 10,5° |
| Für LM-80-... | 71,5 | 6,5 | 8,0 | 6,0 | 7,00 | 0,5 - 1,0 | 8,0° |
| Für LM-92-... | 82,5 | 6,5 | 8,5 | 6,0 | 7,25 | 0,5 - 1,0 | 7,0° |
| Für LM-119-... | 105,0 | 8,5 | 11,0 | 8,0 | 9,50 | 1,0 - 2,0 | 7,0° |
| All dimensions in mm! |
Accessories for fan sleeves type LM
In combination to the fan sleeves type LM various accessories are available, which also can be installed in a very quck way without screws and extra tools.
Guard grills
The specially developed guard grills can be plugged-in very easy into the drilled holes of the fan sleeves pegs of type LM.
Coarse dust filters
The coarse dust filter can be fixed together with the guard grill.
Fan guard EMI-shields
The skinny fan guard EMI-shields can be mounted either at the inside or at the outside of the housing wall.
Customary guard grills
can be fixed with our specially developed lemella rivets while plugging-into the drilled holes of the fan sleeves pegs.
Also you can use customary guard grills, which can be fixed with either screws or our specially developed lamella rivets. Important to know: The protruding pegs ensure sufficient space for air circulation to avoid overheating and possible damage of the device.